My Dad's Latest Rocket Flight on a K550W out at FAR

My Dad, Richard, had an incredible rocket flight from FAR recently to 9,130’ AGL. On board was a GoPro Hero Session, which captured some great footage. The parachute system is very innovative, and makes for a clean deceleration in the video. 


Wish I could have been there myself, but I’m pressed on time to get the drone patents through this year, so I might not be out at FAR for a while. Great flight, dad! 
 

Satellite Skeleton

Hardly a few months after placing 3rd in NASA's Cubequest GT3, and SEDS Triteia has their first chassis. I can't wait to see this get populated with components - including Callan, our Propulsion Division's first printed monopropellant engine. 

Measuring 10x20x30cm, Triteia is a 6 unit Cubesat.  

Measuring 10x20x30cm, Triteia is a 6 unit Cubesat.  

Still awaiting its catalyst pack. 

Still awaiting its catalyst pack. 

And of course none of it would have ever happened without this guy! So eager to have Faris' leadership as VP Engineering next year here at SEDS

And of course none of it would have ever happened without this guy! So eager to have Faris' leadership as VP Engineering next year here at SEDS

A Beautiful Launch

Here's the SEDS UCSD video release. I will expand on the experience and the specifics of the event in the days to come, especially in regards to recovery.  

Two Successful Cold Flows!

Although we had some trouble predicting our burn times, we've had two successful system cold flows now, both in range for a successful flight (750 lbs of thrust for 5-10 seconds). Even without combustion, the pressure relief was enough to shake our vertical test rig. 

With these cold flows out of the way, we are cleared for our lunch date on May 21. We couldn't be more excited. Other areas of the rocket are progressing as well, including refinements to the electronics, boattail, plumbing and pneumatics, and aesthetics.  

The Main Launch Valve, Galahad, nestled in the newly machined struts

The Main Launch Valve, Galahad, nestled in the newly machined struts

Nikolai Dorbritz, Kevin Hoo, and Zoe Warp work on the integration between the fins, boattail, and engine thrust struts. 

Nikolai Dorbritz, Kevin Hoo, and Zoe Warp work on the integration between the fins, boattail, and engine thrust struts. 

The completed 360 degree camera bay has been the work of half a dozen student engineers in SEDS. It will fly onboard the rocket.  

The completed 360 degree camera bay has been the work of half a dozen student engineers in SEDS. It will fly onboard the rocket.  

An ABS 3D printed launch lug I've been designing will guide the rocket along a 1.5" rail during its initial flight.  

An ABS 3D printed launch lug I've been designing will guide the rocket along a 1.5" rail during its initial flight.  

We Finally Met the Launch Pad

I spent the day out at our launch site for the Vulcan, FAR (Friends of Amateur Rocketry) in Mojave. I was able to get some important measurements needed for our initial guidance as well as see some other university projects.  

The tip of the rail. The launch lug fits around it to guide the Vulcan in the first few seconds of flight.  

The tip of the rail. The launch lug fits around it to guide the Vulcan in the first few seconds of flight.  

The entire launch pad lifts pneumaticly, and assembles to 60' in 3 segments.  

The entire launch pad lifts pneumaticly, and assembles to 60' in 3 segments.  

Vulcan Awaits Cold Flow!

3 cold flows, actually. A 'cold flow' is when the system is filled and pressurized akin to the actual launch procedures, with liquid nitrogen in place of lox and isopropanol alcohol substituting for kerosene. This allows us to confirm the system is operating how we expect while discharging propellant at our desired mass flow rates. 

Because there are so many factors in a 'blow down' style sounding rocket to consider, we are planning on conducting 3 cold flows over the course of two days, adjusting propellant volumes and ullage pressures to affect the eventual discharge and atomization of the propellants into the rocket engine. 

The new lox tank is directly above the propellant feed plumbing and main valve, Galahad.  

The new lox tank is directly above the propellant feed plumbing and main valve, Galahad.  

We look at several critical factors in a cold flow: 

1. That we run out of lox before kerosene. By having a small volume of kerosene left to discharge after engine shutdown, we ensure that only fuel will be present for the final moments of powered flight. An oxygen-rich shutdown would risk temperature spikes and accidental ignition of components.  

2. That we don't dip below an acceptable chamber pressure near the end of our burn due to insufficienct nitrogen ullage pressures. This could cause engine burn instability by poor propellant atomization and greatly reduced mass flow rates. 

3. That we obtain and initial thrust at least 3x the weight of the rocket in order to achieve a large enough initial acceleration to reach the speeds required for aerodynamic stabilization by the time the Vulcan reaches the end of its guiding rail.  

4. That the drastic thermal gradients involved don't lower the temperature of the kerosene below its pour point or interfere with the operation of any structural or mechanically active components - like actuating valves.  

With these aims in mind, we are all working hard to make this coming weekend a success and to clear the way for a launch on May 21st! 

The Vulcan awaits its final stages of integration, stored in separate systems.  

The Vulcan awaits its final stages of integration, stored in separate systems.  

Fortunately, we've had a revived effort aimed at making sure our CAD and sims are current and reflective of the actual Vulcan rocket. With the knowledge that we've recently gained from these resources, I can say with some confidence that we are aware of the key weaknesses inherent to our design, such as the proximity of the kerosene to the lox in our Main Valve, shown below. 

An FEA temperature analysis of our Galahad Main Valve shows that it may require some thermal isolation to prevent lowing the temperature of the local stagnant kerosene. 

An FEA temperature analysis of our Galahad Main Valve shows that it may require some thermal isolation to prevent lowing the temperature of the local stagnant kerosene. 

Pressing Forward with the Vulcan Rocket

Catch up on the Vulcan I rocket efforts with some casual iPhone footage that I edited together from the past month of work! 

Many critical components can be seen in their final stages of fabrication and testing, and if all goes well, SEDS will be able to announce a definitive launch date within the next few weeks. 

Experiments With Printing

Over the past month, I've been trying to work on how my CAD skills translate to actual printed peices. As most will tell you, it's not as easy as pressing print.  

The main problems I've been ncounted have been: 

1. Print Orientation:  

With lower end PLA and ABS printers, many peices that fit within the dimensions can't be printed as CADed simply because they don't have an orientation that allows for printing with supports, or requires supports in a place where they are cumbersome to remove.  

2. Size  

With the printer resolution being what it is, when things get <2mm, they tend to turn out poorly unless they are strictly geometric components oriented normal to the print plane. Bigger tends to be better. It's almost like we're reliving in the grainy-thumbnail-image age of the Internet, but with printing. 

3. Filament Feeding

This is a surprisingly frequent error even though it shouldn't be. The spool can sometimes get into a pinched kite-string-nightmare, even if it looks alright at the start of a print. With nothing to monitor tension in the filament feed, I've frustratingly checked up on a few long prints to find a printed layer of empty space and spaghetti on top. 

That said, I've had a lot of success and think my successful attempts might have finally overcome my losses, although only with solid parts so far. 

I tried a few versions of a ball joint out of interest to some moderate success. I'll try another version next week. 

This version worked well, but the next will allow for greater freedom of movement.&nbsp;

This version worked well, but the next will allow for greater freedom of movement. 

After ball joints, I'm trying hinges.  

Weekend Construction: January 23rd-24th

The Vulcan I Rocket is really starting to look like a rocket! We are nearing cold flow testing, and I thought it would be enlightening if I edited together a bunch of short video clips I recorded on my iphone into a brief video detailing SEDS construction efforts! The music was decided by the team members democratically. Take a break and enjoy!

Photos from Saturday 16th Build Day

The parachute is pictured with the singeing we intend to repair. The Recovery structure, behind the parachute, is nearly completed and awaiting paint.&nbsp;

The parachute is pictured with the singeing we intend to repair. The Recovery structure, behind the parachute, is nearly completed and awaiting paint. 

The FFFF black powder charges prepped and shunted prior to testing.  

The FFFF black powder charges prepped and shunted prior to testing.  

Jansen holding the charge bulkhead prior to testing.  

Jansen holding the charge bulkhead prior to testing.  

Nixon Carruthers' preliminary design for the port covers we need. We should have a print to play with by tomorrow.&nbsp;

Nixon Carruthers' preliminary design for the port covers we need. We should have a print to play with by tomorrow. 

Vulcan I Progress

Some photos from our first weekend of work in the new build space. 

Riley prototypes the radio relays we will use to arm the avionics.&nbsp;

Riley prototypes the radio relays we will use to arm the avionics. 

The recovery bay awaits another round of testing this weekend.  

The recovery bay awaits another round of testing this weekend.  

A housing I made in Fusion 360 for our keychain cameras. This design will probably be abandoned in favor of placing the cameras in tapering aft portion of the fiberglass raceway.  

A housing I made in Fusion 360 for our keychain cameras. This design will probably be abandoned in favor of placing the cameras in tapering aft portion of the fiberglass raceway.  

A New Year in a New (Maker) Space

Although Tom graciously allowed us to spend the entirety of Fall Quarter on Campus, we weren't able to bring the rocket to launch readiness by then. With nowhere on campus that came close to providing for an operation of our scale, we had to do some off campus networking, and have gained the sponsorship of Dan - pictured center - who runs a local Maker Space. 

image.jpg

​After several days spent with packing tape and a rental truck, we were able to move all of our stuff to the Open Source Maker Lab in Carlsbad, CA. Here we have immediate access to a variety of machinery that were more difficult to source on campus, including a laser cutter, small mill, small lathe, variety of 3D printers, and welding. I'm looking forward to the productivity that all of this access will bring our newer members. 

Nearly all of it.  

Nearly all of it.  

Now that we are unpacked, we can resume regular working hours of Saturday 9-6, Sunday 1-6, and in the working week when we can. I will post more once we get closer to launch and everything starts coming together.  

Recovery Section of Vulcan Gets Some Paint

The body work in the exterior charge connectors is finally completed! It took a lot of hard work and I'm incredibly grateful for the skilled students who have devoted their efforts to it.  

For some individual shout outs, see the end of this post.  

The completed bay integrates perfectly with the nose cone.&nbsp;

The completed bay integrates perfectly with the nose cone. 

We had some trouble with deformation of the phenolic tube after applying the fiberglass to the two raceways under which we run the cables for carrying the current to our deployment charges, but, with some sanding we were able to reduce this. 

One thing we noticed was that leaving the coupler and shoulder of the nose cone inserted into the airframe tube overnight helped with the static friction the next day. In retrospect, it would have been wise to allow the fiberglass to cure while these were inserted, allowing their stiffness to maintain the phenolic's radial uniformity. However, after that small setback, we are moving forward as planned with intentions to test with full pyros installed this weekend! 

The housings for the banana plug disconnects turned out beautifully!  

The housings for the banana plug disconnects turned out beautifully!  

While I'm incredibly satisfied with how the entire subsystem has turned out so far (and often humbled by the caliber of students that have assisted us), I can't help looking at the system critically. 

Having the connectors on the exterior was a result of several factors:

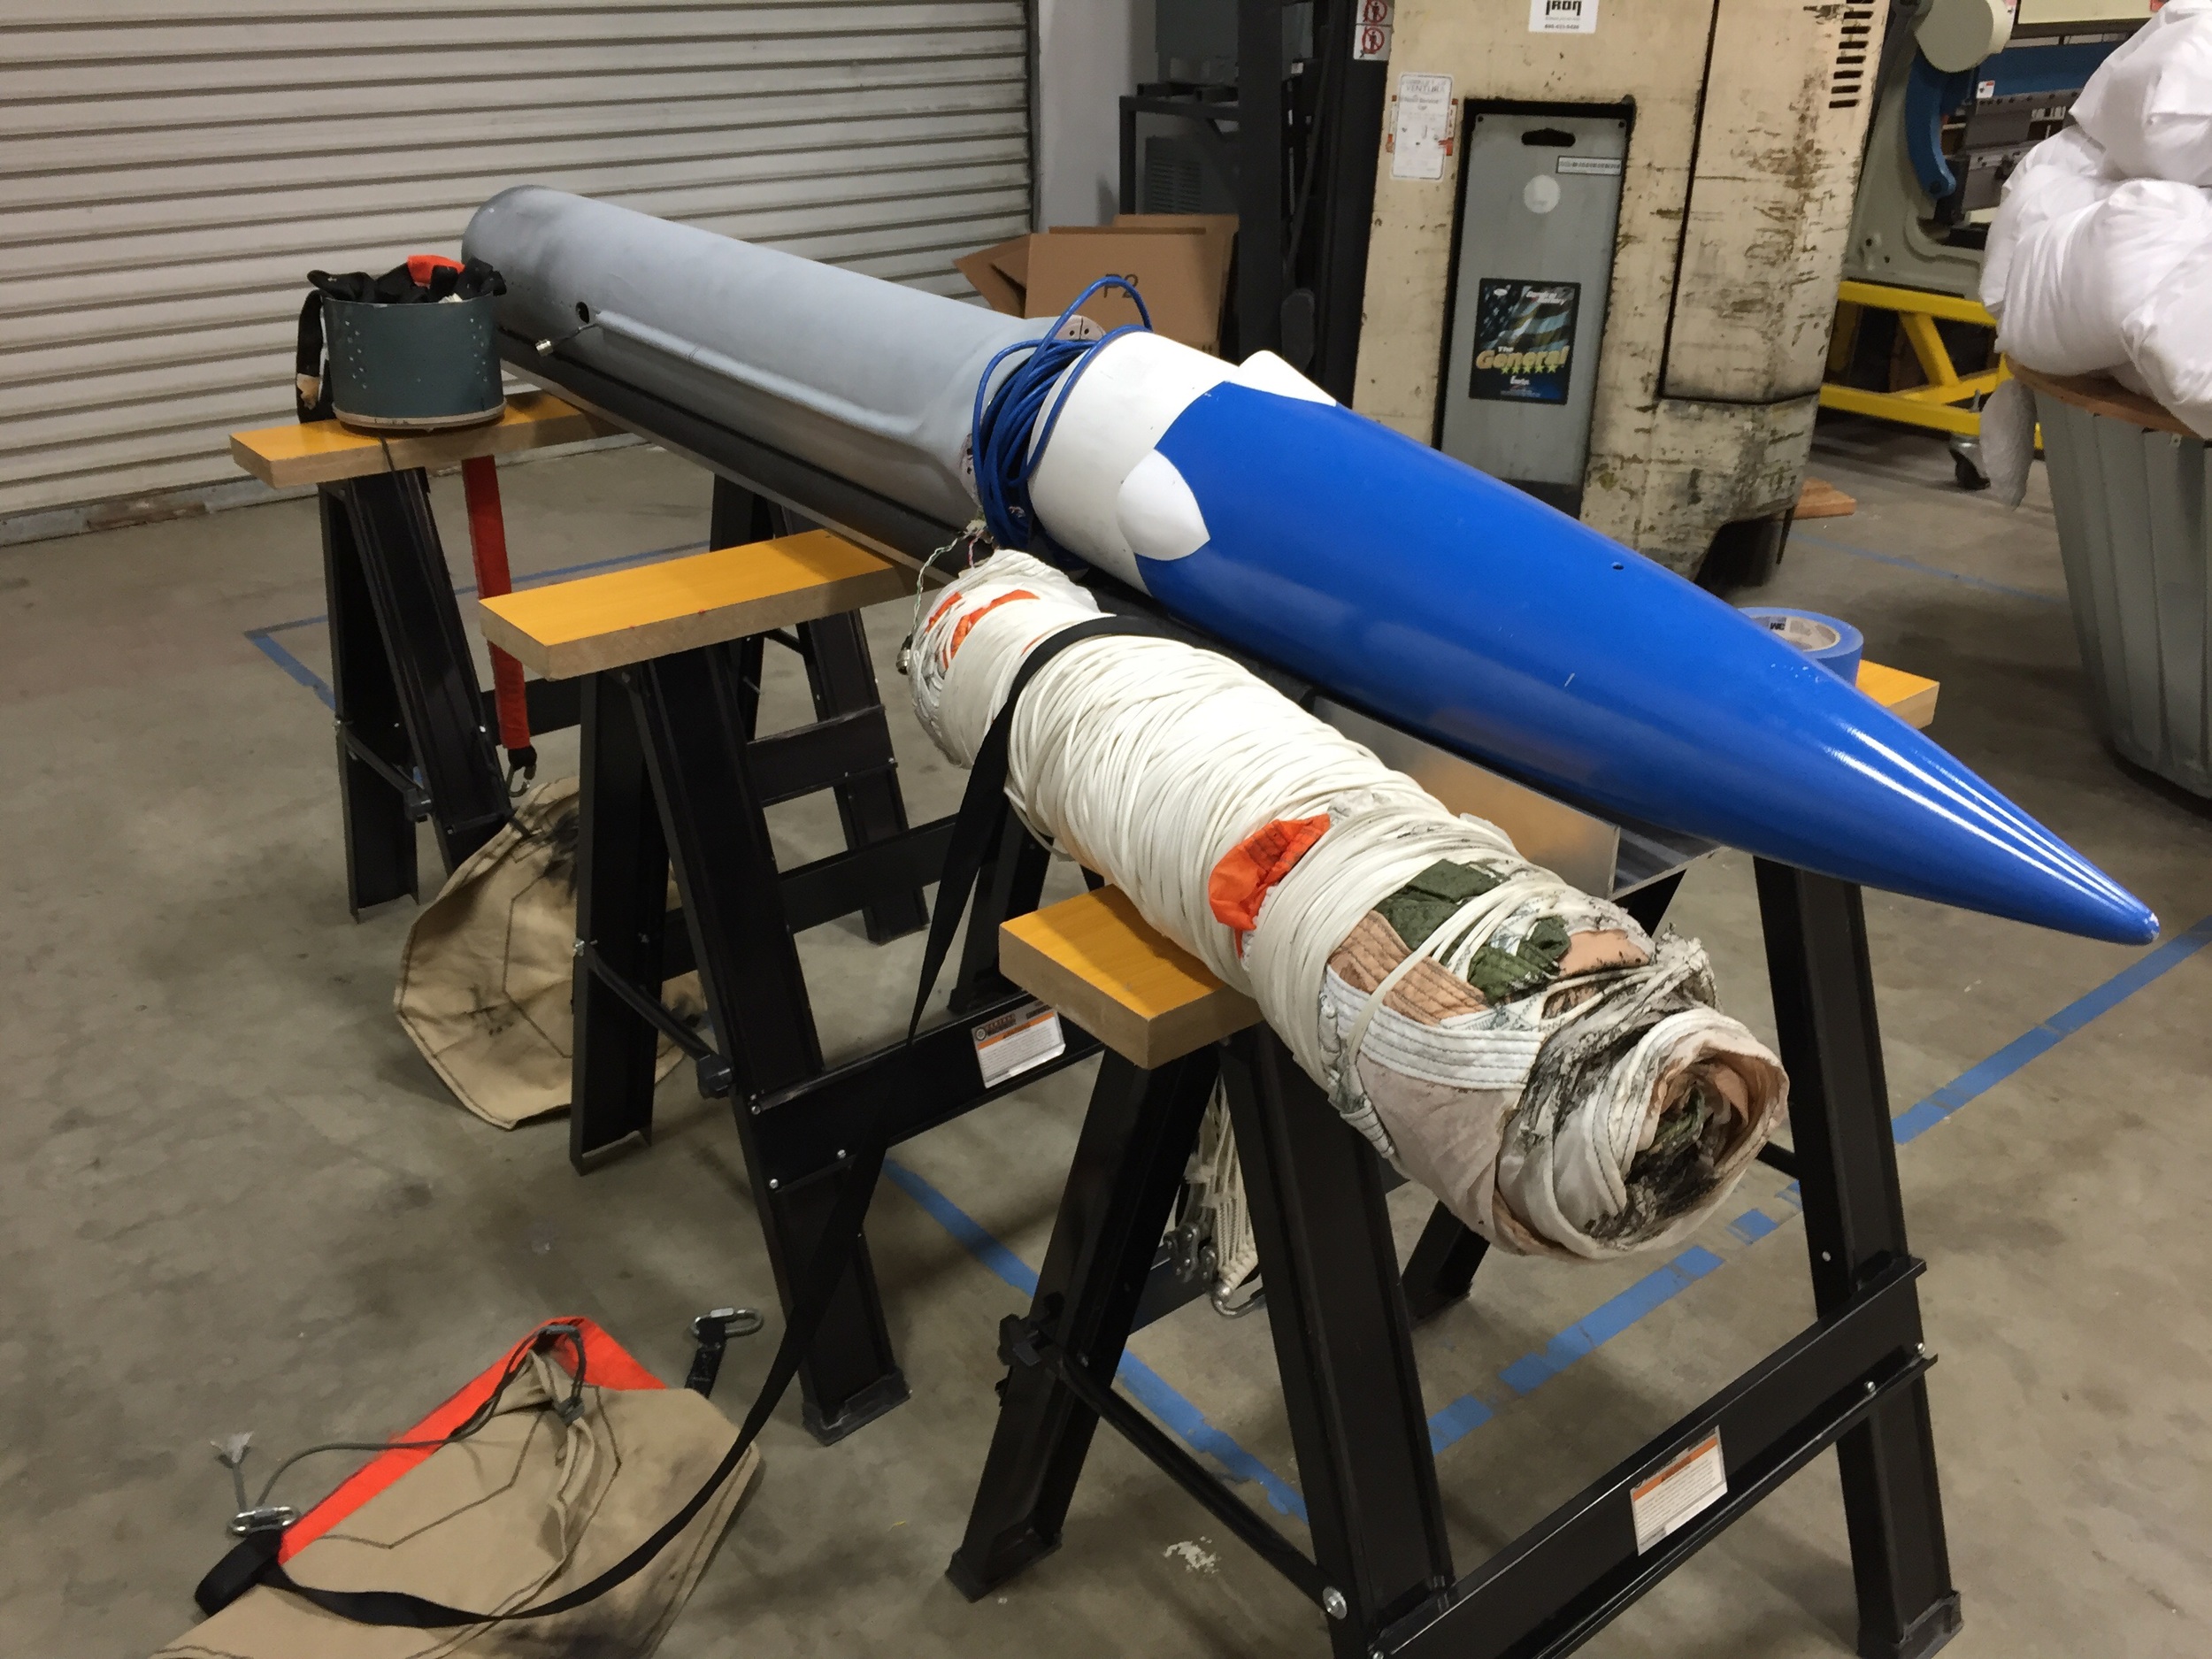
1. The main parachute is huge (28' in diameter), and needs every milliliter it can get.  

2. We initially planned on there being a separate payload bay in the recovery bay, which required having no linear interference which would have been caused by wires.  

Those two points acknowledged, we went with charge carrying wires on the outside. With each ematch having two leads, each ejection well (individual charge) being redundant, and having a two charge redundancy per flight event (main and drogue), we are left needing to bridge a total of 8 wires across the separation point of the nose cone and the airframe. The electrical continuity of these connections need to be unaffected by launch forces, but not prone to seizing or jamming when subjected to the separation force of ejection. 

If I were to do it again, I'd do it more minimally. Our protrusion from the 7.5" diameter we were given is waaaaaay beyond what I would accept if our financial obligations and schedule were different. We don't need anything near a standard banana plug to carry the current needed to ignite our charges; our decisions were largely made in the context of the continual time crunch we've been presented with.  

All that being said, we have what we have and it looks good! If it works, then let's ride on and get this rocket in the air.  

Some much-needed shout outs: 

  - Jefferey Chan. While he's not with SEDS anymore, and pursuing his grad at UCSD, and I often conjure his voice when I need an astute opinion. 

- Kris Obellos. I can honestly say I don't think I've met a guy more consistent and honest than Kris. The work ethic I've seen in him ever since I joined SEDS has really set the standard for me.  

- Austin Lee. Lately Austin has just been killing it. He's been one of the main factors in pushing this subsystem forward after our botched flight attempt in Utah. I see a hunger for progress in him that often has me undecided on things before I ask Austin. Probably for the better too, because he catches what I don't. 

- Zoe Warp. As a new member she has really thrown herself into Vulcan. She's distinguished herself through versatility and an impressive breadth of knowledge she cultivated with her experiences with Triton Rocket Club. I'm grateful someone like her is down to spend weekends with us. 

- Nixon Carruthers. He has taken his knowledge gained through surfboard fabrication and directed it toward the world of engineering composites, and I couldn't be more stoked by what I see. Nixon could be wherever he wants in a few years, and I can't wait to see where he takes his talent. 

- Jansen Quiros. While I'm still understanding how he works, I get the feeling he's a patient guy. He understands technical concepts instantly and isn't afraid to jump in when he has something to say. 


Airframe Work

Several new members try their hand at fiberglassing the raceways on the upper portion of the Vulcan I.  

This year our new members have become more involved than anyone had hoped in our current projects - we are fortunate and thankful to have received such exceptional talent from our recruitment! 

Cold Flow Failure; Understood But Disheartening.

The cold flow was a bit of a flop. Or at least an unconvincing gush. I spent the day inside, working on the camera bay (pics to come), but followed the buzz of GroupMe messages as the plumbing and engine team set up, filling the water and liquid nitrogen to replace the actual fuel and oxidizer to as it would be on launch day. 

When the countdown did come, it ended in an instant pressure loss and a water fountain of leaks in different locations. Yikes. We had 4 main problems: 

1. The two orings between the printed injector plate and the chamber of the rocket engine weren't installed. I was particularly alarmed by this oversight, as this would have resulted in a destructive failure of the engine. This was mainly a procedural error. Because the rocket engine was not actually firing, it wasn't given the same attention that it would have for an actual launch. This meant that the cold flow video showed a disk of water gushing out of where the seal should have been.

2. In addition to the mistake with the engine preparation, the valve that we redesigned failed. This was due to the aluminum handle which translates the force from the firing piston to the steel torque rod which attaches internally to the ball valve. Because of the differential in the expansion between the steel and the aluminum, the pressed connection between the lever and the driving axle slipped on the cryogenic side. Our intended fix is swapping out the aluminum handle for a steel one and welding the two together once we press fit it. 

image.jpg

3. In addition to all of this, the AN fitting on the fuel into the engine wasn't tightened all the way, so water sprayed out of this during the firing. Another procedural error. 

4. Finally, the liquid nitrogen tank hardly filled - either our dewar pressure is too low, or the head on it is too large, and the height difference between the tank inlet and the dewar is enough to prevent filling. Because the jump to the next pressure dewar that we can order from the school is significant (around 260 psi, I believe), we would rather find a way to fill with the higher pressure dewar. So the fix we have in mind for now is to simply lift the dewar up higher using a shop lift. If this works, we will find a way to do this safely at the launch.  

I am not encouraged by the results of this cold flow - there doesn't seem to be much procedural oversight, and simple mistakes that could instantly destroy the entire rocket should not be taken lightly. This is especially the case when they occur in pairs with other, even more alarming hardware failures. I am hoping that a visit from 7 of NASA's Engine Testing engineers will assist us in overcoming some of these aspects. It will take several resounding successes to convince me not only of the viability of the system, but the familiarity with the complete launch preparation procedures. 

The recovery, camera bay, and avionics portions of the rocket are progressing as planned, albeit at a slower rate than anticipated. Pictures and an update on that portion of the rocket coming soon.


Recovery and Avionics Near Completion

We've made a number of changes since our near launch attempt in Utah, most of them aimed at assembling the completed recovery system for parachute deployment more quickly and simply.  

The nearly completed avionics sled.  

The nearly completed avionics sled.  

The largest and most exciting change will be radio controlled relays for arming both altimeters and our own electronics system – an improvement which eliminates the need for a physical arming switch to be pulled when the rocket is in its launch configuration on the pad. 

Because there will be a lot of hustle and bustle around the rocket prior to launch, remote arming helps streamline the process. Additionally, a short range audio system will allow us to monitor the tones emitted by the altimeters prior to launch and identify any problems from the bunker.   

The wiring carrying the current for the ejection charges has been covered in filler, and is nearly ready for a final layer of fiberglass. If everything goes to schedule, the recovery airframe should be painted by the end of the week.

Kris Orbellos secures the outer wiring prior to addition of the filler in the above video clip. The pull-away connectors transferring the deployment current from the electronics sled in the nosecone to the airframe, and eventually to the charges located on the central recovery bulkhead, are housed inside the pink shells in the photo below. 

This will be painted and glossy by the weekend!  

This will be painted and glossy by the weekend!  

Overall, the pace looks good, but it's better to be ahead of schedule, so I'll be on rocket-duty all tomorrow to try and stay on track.  

Rocket System Days Away from a Fully Pressurized Cold Flow

We are less behind than usual!  

Everyone has been working eight hour days on the weekends in order to get the rocket ready for our most crucial pre-flight test. Engineering students Deenah Sanchez, John Marcozzi, and Dennis Ren can be seen working on the hydrogen fill line plumbing at all angles in the above time lapse. This Wednesday we will fill the fuel and oxidizer tanks with liquid nitrogen and watr as replacements, and then pressurize the system just as it would be for launch. 

Once remotely pressurized, the system is ready for testing, and actuation of the main valve - pictured below - will release the nitrogen and water for mixture in the combustion chamber. 

image.jpg

Some of the key things we are looking for in this test: 

     - tank fill times for the cryogenic side of the system are reasonable (should be the case with our higher pressure dewar) 

     - valve actuation is instantaneous and doesn't appear to be slowed by internal or external ice build up  

     - all the liquid is pressure fed out of the nozzle in the time we expected, which is reflective of our burn time  

Busy Times Are Good Times

And we've got plenty to do.  

Mostly plumbing and recovery/areoshell work remains. A few of the aluminum pipe bends for the lox line have yet to be perfectly rendered. The exterior wiring/raceway on the recovery bay is being prepped for a fiberglass layer.  

We also found the missing struts I made that cinch down the areoshell to the aft camera bay bulkhead! We had lost hope in finding them after the move to our new construction space, and I was putting off making a new set. This appears to be a rare circumstance where procrastination has payed off!